
Picking the right tool for creating screencasts and video tutorials can be overwhelming, given how many software options are out there. Free Cam is one option worth a closer look for anyone working on Windows.
Here’s an overview of this free screen recording and editing platform for Windows, and how it can help you put together polished screencasts.
Key Takeaways
- Free Cam is a screen recording and video editing software built specifically for Windows users.
- It offers features such as screen recording, webcam recording, audio recording, video editing, and annotation tools.
- With Free Cam, you can create screencasts and video tutorials by capturing your computer screen, webcam footage, and clear audio at the same time.
- The software also includes editing functions to trim videos, add annotations, adjust audio levels, and export the finished videos in various formats.
Together, these tools cover the full process from recording to final export, so you don’t need separate apps for each step.
Best Tools for Recording Training Videos and Video Tutorials
There are several tools available for recording training videos and video tutorials, including iSpring Suite, Camtasia, Screencastify, Loom, Screencast-O-Matic, Bandicam, Movavi, Wevideo, Droplr and Vmaker.
iSpring Suite
iSpring Suite is an eLearning authoring tool that I’ve found to be extremely useful. It allows me to create interactive courses, assessments, and even video tutorials with ease. One unique feature it offers is PPT to SCORM conversion, which turns my PowerPoint presentations into engaging eLearning content in a snap.
I really enjoy the fact that it gives me the ability to record videos from both my screen and webcam. This makes screencasts or video tutorials a breeze. It even includes a built-in video editor for adding helpful hints or making last-minute edits before I share.
And the best part? They offer a free 14-day trial so you can test out all these great features firsthand!
Camtasia
Camtasia rises among the leading tools for recording training videos and video tutorials. Its reputation stems from its strong feature set tailored explicitly for creating instructional videos and screencasts.
Whether you’re using Windows or Mac, Camtasia caters to both operating systems. This makes it versatile across different devices.
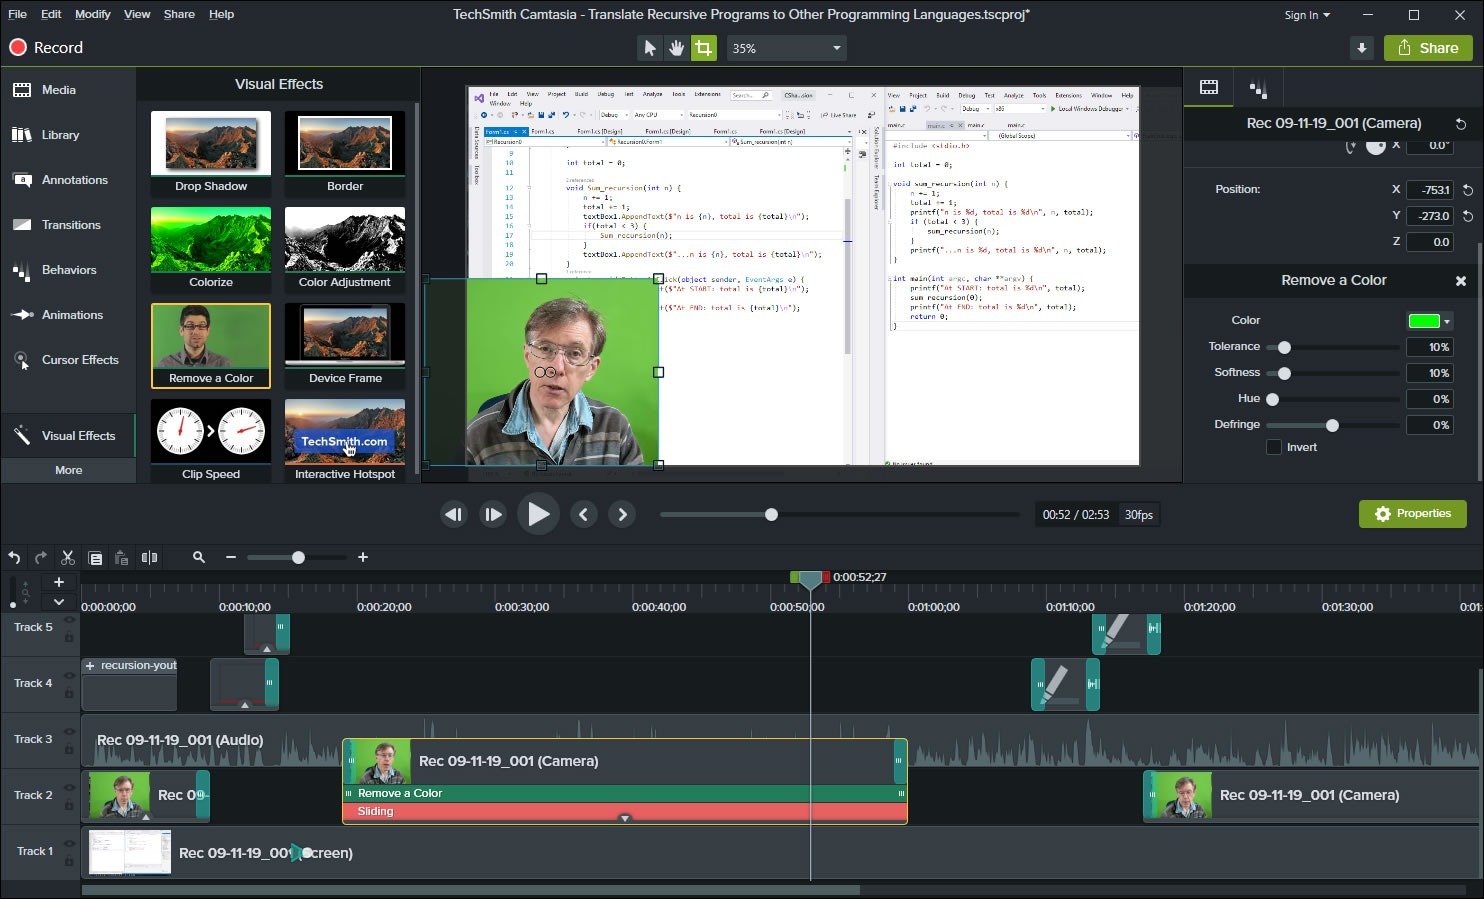
Camtasia 2021 is the latest version of this powerful software, equipped with new features that make designing visually compelling training videos even easier. You can take advantage of advanced video editing tools as you create your content.
With Camtasia at your disposal, producing professional-grade instructional videos will seem like a breeze!
Screencastify
Screencastify hits the top of my list for recording training videos and tutorials. A favorite among educators and trainers, this tool delivers as a screen recorder for Chrome. With just a few clicks, I’m able to record anything on my computer or tablet’s display.
It goes beyond simple screen capturing. This offers video editing options that help me make compelling video content right after recording. Sharing videos doesn’t get any easier than Screencastify; it integrates well with various platforms allowing me to distribute my educational content swiftly.
Whether it’s creating class assignments or making tech tutorial videos, Screencastify makes the job efficient and smooth.
Loom
Loom is a powerful tool for recording training videos and video tutorials. With Loom, you can easily create screencasts and instructional videos for teaching and training purposes.
It is trusted by over 21 million people and offers advanced editing features to enhance your videos. Loom’s instant sharing feature allows you to quickly share your videos with others.
Whether you’re a teacher looking to create instructional content or a professional wanting to train others, Loom is a reliable choice for creating engaging video tutorials.
Screencast-O-Matic
Screencast-O-Matic is one of the best tools available for recording training videos and video tutorials. With this tool, I can easily capture my screen, record audio, and even capture my webcam if needed.
What’s great about Screencast-O-Matic is that it allows me to schedule recordings, which is perfect for planning ahead and staying organized. Whether I need to create online training modules, informative video tutorials, or engaging sales presentations, Screencast-O-Matic has all the features I need.
Plus, it offers both free and paid options. This gives me flexibility based on my budget and requirements. Overall, Screencast-O-Matic is a versatile and easy-to-use tool that helps me create professional-quality videos with ease.
Bandicam
Bandicam is an all-in-one screen recorder that I highly recommend for recording training videos and video tutorials. With its advanced features, it allows you to record your computer screen, games, and even webcams with audio.
One of the standout features of Bandicam is its ability to capture videos in 4K Ultra HD quality. This ensures that your videos are crystal clear and visually appealing. Not only is this software easy to use, but it’s also lightweight. This makes it a convenient option for creating engaging screencasts on the go.
If you’re looking for a reliable and efficient screen capture software, Bandicam should definitely be at the top of your list.
Movavi
Movavi Screen Recorder is a powerful tool for creating engaging screencasts and video tutorials. With this software, you can record your training videos in high-definition quality. This ensures that every detail is captured with clarity.
Whether you’re creating content for online learning or sharing knowledge with others, Movavi Screen Recorder has all the features you need. Not only does it allow you to draw on the video while recording to provide visual annotations or explanations, but it also lets you include yourself in the training videos by capturing webcam footage.
With Movavi Screen Recorder, creating professional-quality screencasts has never been easier.
Wevideo
WeVideo is an online video editor that simplifies screen casting and allows users to create professional-quality videos. With WeVideo, you can import, edit, and export videos directly in your browser without the need for any additional software.
It offers a range of powerful video editing tools that enable you to enhance your screencasts and tutorials. Additionally, WeVideo Academy provides tutorials and information on video editing and all the features that WeVideo has to offer.
Recently, WeVideo also added simultaneous screen and webcam recording capability. This makes it even easier to create engaging videos.
Droplr
Droplr is the ultimate tool for recording training videos and video tutorials. With its screen recording app, you can capture your screen, webcam, or both to create engaging content.
It’s perfect for employee training videos and introductions. Not only does Droplr allow you to instantly capture screenshots and screencasts, but it also saves them to the cloud. And with a shareable link, you can easily distribute your videos to colleagues or clients.
Give Droplr a try with their free trial and discover how easy it is to capture and share your screen recordings.
Vmaker
Vmaker is a fantastic screen recording tool that I highly recommend for creating engaging screencasts and video tutorials. With Vmaker, you have the flexibility to record your screen, camera, or both. This gives you multiple options for capturing your content.
The best part? It’s absolutely free! Plus, Vmaker offers editing capabilities so you can enhance your recorded videos before sharing them with others. And if you need some guidance along the way, Vmaker provides a tutorial center filled with useful tips and tricks to help you create captivating videos on their platform.
So why wait? Download Vmaker now and start creating amazing video tutorials today!
Core Features of Video Tutorial Software
Video tutorial software offers a range of core features that make creating engaging screencasts and video tutorials easy and efficient. From screen recording and webcam recording to audio recording and video editing, these tools provide everything you need to create professional-looking instructional videos.
Want to learn more? Keep reading!
Screen recording
Screen recording is a key feature of Free Cam, a easy-to-use screen recording and video editing software designed specifically for Windows users. With Free Cam, you can easily capture everything happening on your computer screen, whether it’s a tutorial on how to complete a specific task or sharing knowledge on a particular topic.
By creating instructional videos with screen recordings, you engage your audience more effectively than with plain text instructions. This makes it an ideal tool for teaching and sharing information.
Plus, Free Cam provides an easy and fast way to create these videos. This allows you to edit and enhance them before exporting and sharing with others.
Webcam recording
Free Cam offers an impressive webcam recording feature that allows users to create engaging video tutorials and instructional videos. With the ability to record both the screen and webcam simultaneously, Free Cam provides a more immersive tutorial experience for viewers.
This core feature enhances engagement and effectiveness by allowing presenters to visually demonstrate concepts while maintaining a personal connection with their audience. Whether it’s capturing facial expressions or showcasing step-by-step processes, Free Cam’s webcam recording feature is central in creating interactive and impactful video tutorials.
Audio recording
Free Cam offers a powerful audio recording feature that allows users to capture high-quality audio along with their screen and webcam footage. Whether you’re creating live-action videos, animations, or screencasts, Free Cam ensures that your video tutorials have clear and professional-sounding sound.
With various audio recording options available, you can easily capture narration, background music, or any other audio elements you need for your instructional videos. Additionally, Free Cam’s editing tools allow you to trim and cut your audio recordings. This ensures that the final result is polished and tailored to your needs.
This makes it easy for users to create engaging video tutorials with excellent audio quality from start to finish.
Video editing
Free Cam offers a complete set of video editing functions that make it easy to enhance your screencasts and video tutorials. With Free Cam, you can trim your videos to remove any unwanted sections and ensure a smooth flow of content.
You also have the ability to add annotations, such as text or arrows, to highlight important points or provide additional explanations. Additionally, Free Cam allows you to adjust audio levels so that viewers can clearly hear your narration or any background music.
Once you’re done editing, you can export your videos in various formats. This gives you flexibility in how you share and distribute your content.
Annotation tools
Annotation tools are an essential feature in video tutorial software like Free Cam. These tools allow users to add text, arrows, highlights, and other annotations to their instructional videos.
With annotation tools, educators, businesses, and professionals can enhance the learning experience by providing visual cues and explanations within their videos. This helps viewers understand key points and concepts more effectively.
Popular options for annotation tools include Free Cam itself, Screencastify, and Camtasia. By utilizing these tools, users can create engaging instructional videos that maximize learner engagement and facilitate interactive learning experiences without any hassle or technical expertise needed.
How to Create Engaging Screencasts and Video Tutorials with Free Cam
Free Cam is a screen recording tool that offers features like annotation tools, high-quality video recording, and easy editing options. This guide walks through how to use it to create screencasts and video tutorials that hold an audience’s attention rather than just showing raw footage of a screen.
It covers the process of planning your content, setting up your recording environment, and producing a professional-looking video with Free Cam, from the first decision of what to record through to sharing the finished file.
Choose a topic
The first step in creating a screencast or video tutorial with Free Cam is choosing a topic you want to teach or explain. Consider your target audience and what they’re likely to be interested in learning.
It could be a specific software tutorial, a demonstration of a process, or any subject you’re knowledgeable about and want to share. Think about what kind of content would be genuinely helpful and valuable to your viewers, rather than picking a topic just because it’s easy to record.
Once you’ve chosen a topic, you can move on to planning and scripting your content, which is where the tutorial really starts to take shape.
Free Cam is a versatile tool that supports a wide range of topics and formats, so it’s worth exploring a few different approaches before settling on one that fits both your subject and your audience.
Plan and script your content
When creating a screencast or video tutorial with Free Cam, it’s worth planning and scripting your content before you start recording. A clear plan helps your tutorial flow smoothly and communicates the information to your audience more effectively.
Start with the topic you’ve chosen for your viewers, then outline the key points you want to cover in the tutorial and write a script that guides your presentation from start to finish.
A script helps you stay on track while recording and deliver the necessary information concisely, instead of talking through it on the fly. Planning and scripting your content lets you organize your thoughts and give the video structure, which in turn makes it easier for your audience to follow along.
Set up your recording environment
To set up your recording environment with Free Cam, start by launching the software on your Windows computer. The interface lets you customize the recording settings according to your preferences.
Before you start recording, select the camera mode and adjust any necessary recording settings in the dedicated window. Free Cam’s settings are customizable enough that this setup step shouldn’t involve much hassle or technical difficulty.
With your recording environment set up, you’re ready to start capturing content for your audience, working from the script you put together in the planning step.
Start recording with Free Cam
To begin recording with Free Cam, open the software and choose the screen or window you want to capture. The interface makes it straightforward to start the recording process.
You can also select options like audio sources and webcam settings before hitting the record button. Once you’re finished recording, Free Cam lets you edit and enhance your video with features like trimming, adding captions, and highlighting certain areas of the screen.
When you’re satisfied with your edits, export your video in a variety of formats and share it on platforms like YouTube, without watermarks or time limits.
Edit and enhance your video
Editing is what turns a raw screen recording into a polished screencast or video tutorial. With Free Cam, you can make adjustments to improve the overall quality of your recording.
Start by trimming any unnecessary parts of the video to keep it concise and focused. You can also add transitions between different sections to make the flow smoother. Don’t forget to include annotations and callouts to highlight important points or provide additional information.
Lastly, adjust the audio levels and add background music if you want a more professional feel. Taking the time to edit and enhance your video with Free Cam is what makes the difference between a raw recording and a screencast or tutorial that’s genuinely engaging and informative for your audience.
Export and share your video
Once you’ve finished editing your video with Free Cam, it’s time to export and share it with others. With just a few clicks, you can save your video in a variety of formats, including MP4, AVI, WMV, and GIF.
This allows for easy compatibility across different devices and platforms. After exporting, you can choose to upload your video directly to YouTube or other social media platforms.
You also have the option to save your video locally on your computer or share it via email or cloud storage services, depending on who you’re sending it to and how they’ll want to view it.
Conclusion
Free Cam covers the basics you need for screencasting: an easy-to-use interface, straightforward screen recording, and built-in video editing tools. Together, these features let you capture footage and clean it up in one place, without switching between separate apps.
For teachers, trainers, and other content creators, Free Cam has what’s needed to produce clear, high-quality instructional videos. Its recording and editing tools cover the core work, from capturing a screen to trimming and polishing the finished video, so the result holds an audience’s attention.
FAQs
1. Is Free Cam really free to use?
Yes, Free Cam is completely free to use. There are no hidden costs or subscription fees.
2. Can I create screencasts and video tutorials with Free Cam?
Absolutely! Free Cam is designed specifically for creating engaging screencasts and video tutorials with ease.
3. Does Free Cam offer editing features?
Yes, Free Cam offers a range of editing features such as trimming, cutting, and adding annotations to enhance your videos.
4. Is Free Cam compatible with both Windows and Mac?
Yes, Free Cam is compatible with both Windows and Mac operating systems. This makes it accessible to users on different platforms.
5. Can I record audio along with my screen recording using Free Cam?
Certainly! With the built-in microphone support in Free Cam, you can easily record your voice narration or add background music to your screencast or tutorial videos.
Compare alternatives to the tools in this post

- Independent picks for exactly what you just read about
- Matched to your team size & needs
- Vendors don't pay for placement
Step 1 of 4
How big is your team?
We tailor recommendations to companies your size.














Related Articles
Accounting Software
How To Choose The Best Procure-to-Pay Software For 2026
Continue reading →
Accounting Software
Best QuickBooks Alternatives in 2026: Top Accounting Software Options
Continue reading →

Accounting Software
How To Choose The Best Interior Design Software For 2026
Continue reading →
Accounting Software
Free Design Tools: Say Goodbye to Boring Invitations in 2026
Continue reading →