


AirDrop is Apple’s built-in wireless transfer feature for sharing files between iPhones, iPads, and Macs. It works over Bluetooth and Wi-Fi, so there’s no cable, email attachment, or third-party app involved once it’s set up.
This guide walks through how to turn AirDrop on for each device, then how to actually send files between an iPhone, iPad, or Mac depending on which direction you’re transferring in.
Key Takeaways
- Enable AirDrop on your iPhone or iPad by opening the Control Center and tapping on the AirDrop icon.
- Enable AirDrop on your Mac by going to the Control Center or opening a Finder window and selecting “AirDrop”.
- To transfer files from your iPhone to your Mac, open the Control Center, select AirDrop, choose who you want to share with, then find the file and tap Share -> AirDrop.
- To transfer files from your Mac to your iPhone, make sure both devices are connected to Wi-Fi and have Bluetooth enabled. In Finder, right-click on the file you want to share, select Share -> AirDrop, choose your iPhone’s icon, then accept the transfer prompt.
Enabling AirDrop on iPhone and iPad
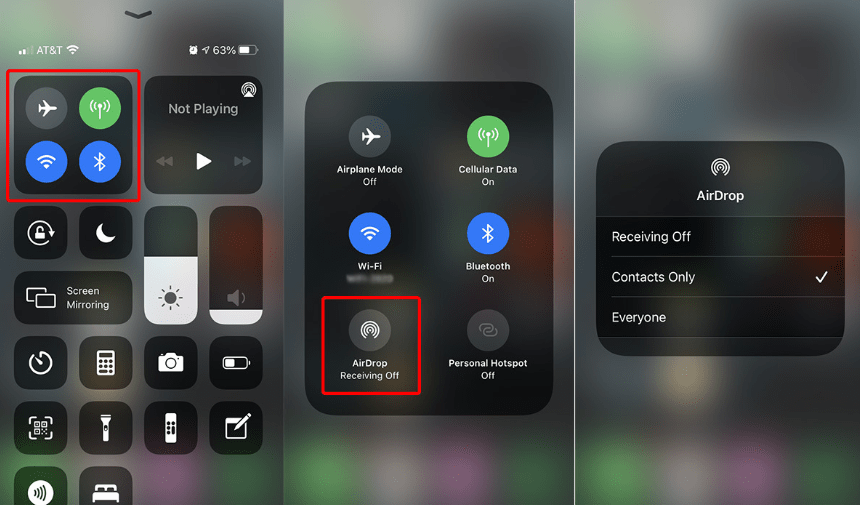
To enable AirDrop on your iPhone or iPad, open the Control Center by swiping down from the top right corner of the screen and tap the AirDrop icon.
Turning on AirDrop in the iOS Control Center
Accessing AirDrop through the iOS Control Center is the fastest way to get files moving between Apple devices. First, swipe up from the bottom of your iPhone screen, or swipe down from the top right corner if you’re using an iPhone X or later.
Then, press and hold the network settings card in the upper left corner, which includes buttons for airplane mode, cellular data, Wi-Fi, and Bluetooth. Once it expands, you’ll see an additional set of options, including AirDrop.
Tap on it and choose one of three access levels: Receiving Off (which turns off AirDrop), Contacts Only (only people in your contacts can see your device), or Everyone (all nearby iOS devices using AirDrop can see your device).
AirDrop is now active and ready to send or receive files.
Enabling AirDrop on Mac
To enable AirDrop on your Mac, go to the Control Center and turn it on. You can also enable AirDrop in Finder for quicker access. Both methods are covered below.
Turning on AirDrop in the macOS Control Center
To turn on AirDrop in the macOS Control Center, click on the Apple menu located at the top-left corner of your screen. Then select “System Preferences” from the dropdown menu.
In the System Preferences window, click on “General.” Next, navigate to the section labeled “Allow Handoff between this Mac and your iCloud devices” and make sure it’s checked. Then close the System Preferences window.
Once you’ve completed these steps, AirDrop will be enabled in your macOS Control Center and you can start sharing files wirelessly with nearby devices.
Turning on AirDrop in Finder
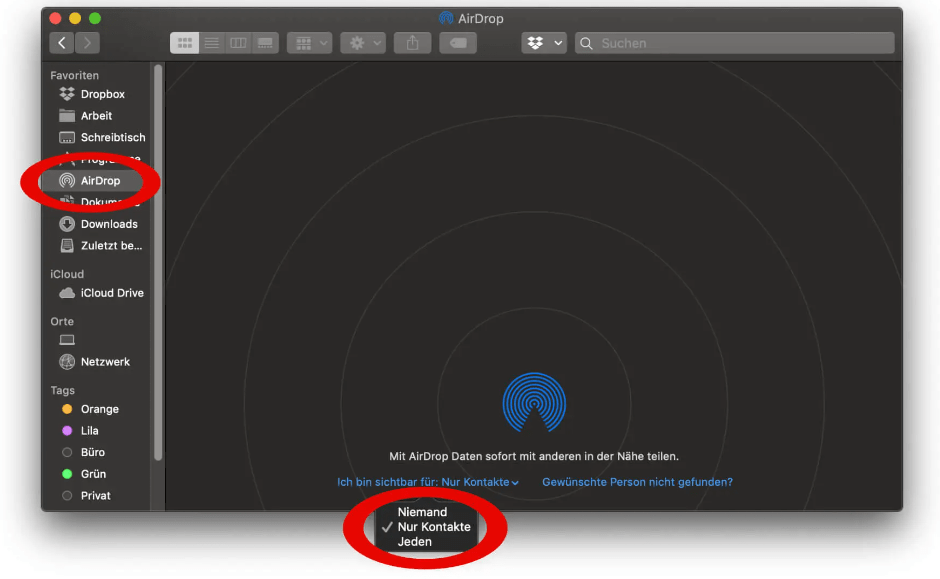
To turn on AirDrop in Finder, open a Finder window on your Mac. Then click on “Go” in the menu bar and select “AirDrop” from the drop-down menu. Alternatively, you can press Command + Shift + R to open AirDrop directly.
Once you’re in AirDrop, make sure that both Bluetooth and Wi-Fi are turned on. You can check this by looking at the icons at the top of the Finder window, or by going to System Preferences > Bluetooth and Wi-Fi.
With AirDrop enabled in Finder and Bluetooth and Wi-Fi turned on, you’re ready to start sharing files wirelessly with nearby devices.
How to AirDrop Files
To AirDrop files, go to the Control Center on your iPhone or iPad, tap on the AirDrop button, and choose who you want to share the file with. It’s a quick way to move files wirelessly between Apple devices.
The exact steps differ slightly depending on which devices you’re sending between and which direction the file is moving, so here’s how each of the common cases works in practice.
AirDrop From iPhone to Mac
To AirDrop files from your iPhone to your Mac, both devices must have AirDrop enabled and be within range of each other. First, open the Control Center on your iPhone by swiping down from the top right corner of the screen (on iPhone X or later) or swiping up from the bottom of the screen (on older models).
Then press and hold the network settings card located at the upper left section of Control Center. This brings up additional options, including AirDrop. Tap on “AirDrop” and select either “Contacts Only” or “Everyone”, depending on who you want to be able to see and send you files via AirDrop.
Next, open Finder on your Mac and click on “AirDrop” in the sidebar. Make sure Wi-Fi is turned on for both devices. On your iPhone, go to the Photos app (or any other app with a file you want to share), find the file you want to transfer, tap the Share button, and choose AirDrop from the available options.
Your Mac should appear as an option in the list of nearby devices. Tap on your Mac’s name and wait for it to accept the file transfer request.
AirDrop From Mac to iPhone

To AirDrop files from your Mac to your iPhone, first make sure both devices are on the same Wi-Fi network and have Bluetooth enabled. Then open Finder on your Mac and select the file you want to share.
Right-click on the file and choose “Share” from the drop-down menu. In the sharing options, click on AirDrop. Your iPhone should appear as an option in the list of nearby devices. Tap on your iPhone’s icon, and a prompt will appear asking if you want to accept the file transfer.
Tap “Accept” to start transferring the file from your Mac to your iPhone wirelessly via AirDrop.
AirDrop a Word, Excel, or PowerPoint File
To AirDrop a Word, Excel, or PowerPoint file between your Apple devices, open the document you want to share on your iPhone or iPad and tap the Share button.
Then select the device you want to send it to from the list of available options. On your Mac, open the file in its respective application and click on File > Share > AirDrop. Choose the device you want from the list that appears.
With just a few clicks, you can share documents across your Apple devices using AirDrop’s wireless file transfer feature.
Conclusion
AirDrop is a convenient feature built into Apple devices for sharing files without cables, email attachments, or third-party apps. Once it’s enabled on both ends, sending photos, documents, and other files between your iPhone, iPad, and Mac takes just a few taps.
Whether you’re sending files from your iPhone to your Mac or the other way around, AirDrop keeps device connectivity and data transfer simple within the Apple ecosystem. Use the steps above whenever you need to move a file to a nearby Apple device, and double-check that Wi-Fi and Bluetooth are on if a device isn’t showing up.
FAQs
What is Airdrop and how does it work?
Airdrop is a feature on iOS devices that allows peertopeer sharing, using Bluetooth and WiFi for device connectivity and data transfer such as photo sharing.
How do I use Airdrop to send files between devices?
To use Airdrop for sending files between devices, you first need to unlock your iPhone, then open the Finder app and navigate to the Favorites section where you’ll find the option to share with nearby devices through Airdrop.
Why won’t my device connect via Airdrop?
Your device may not connect via airdrop due do issues with Bluetooth or WiFi connectivity. Ensuring both are activated will solve most problems related with device connectivity.
Can I use Airdrop for cross-platform file sharing?
No, currently, cross-platform file sharing isn’t supported by AirDrop which works only among Apple products.
Is there any other way of sending photos apart from Photo Sharing in iPhone?
Yes! You can also make use of Device Synchronization methods which allow a seamless exchange of photos along with various kinds of other data.

- Independent picks for exactly what you just read about
- Matched to your team size & needs
- Vendors don't pay for placement
Step 1 of 4
How big is your team?
We tailor recommendations to companies your size.















Related Articles
Buyers guide
Twilio Alternatives 2026: 6 Compared and What They Cost
Continue reading →
IT Management
RMM Software: 25 Tools Ranked by 1,843 Reviews
Continue reading →

Buyers guide
How To Choose The Best Freelance Platforms For 2026
Continue reading →

Best Tools
SaveFrom.net: Norton Clears It, the Ads Are the Risk
Continue reading →