Lightshot Screenshot is a simple, free tool that makes screen capturing faster, smarter, and more useful. With features like instant editing, sharing, and custom shortcuts, it’s designed for anyone who takes screenshots regularly. Screenshots are a quick way to share ideas, report issues, or save information.
This guide covers how Lightshot works, its key features, and why it stands out from other tools.
What is Lightshot?
Lightshot is a free and easy-to-use screenshot tool designed to make capturing and sharing images from your screen faster and more efficient. Unlike built-in tools that offer limited functions, Lightshot comes with features like real-time editing, quick uploads, and custom hotkeys.
Whether you’re working on a project, reporting an issue, or sharing visuals with a team, this tool helps you do it with minimal effort. It’s available for both Windows and macOS, and also as a browser extension for Chrome and Firefox.
Why it matters
Managing screenshots efficiently is more important than most people realize, especially in remote teams, digital classrooms, and fast-paced workflows. With employee productivity and communication clarity at stake, tools like Lightshot play a small but powerful role in streamlining daily tasks.
Why Use a Dedicated Screenshot Tool Like Lightshot?
Most devices come with built-in screenshot tools, but they’re often limited to basic functions like capture and save. For users who need speed, editing, or sharing capabilities, these defaults fall short.
Lightshot fills that gap by offering a range of productivity-focused features in one lightweight package.
Here’s why it matters:
- Time-saving workflows: Take, edit, and share screenshots in seconds—no extra software needed.
- Clearer communication: Add arrows, text, and highlights directly on your capture.
- Instant sharing: Upload your screenshot and get a shareable link instantly.
- Custom controls: Set hotkeys for faster access and smoother multitasking.
- Cross-platform support: Available on Windows, Mac, and browser extensions.
For teams working remotely, tech support agents, or anyone who shares visual feedback often, having a tool like Lightshot can make daily tasks simpler and faster.
Top Features of Lightshot
Lightshot keeps things simple without cutting corners. Its feature set is designed to boost productivity while staying easy to use.
| Feature | What It Does |
|---|---|
| Quick Selection | Drag to select any area of your screen for a precise capture. |
| Instant Editing | Add text, arrows, boxes, and highlights before saving or sharing. |
| Cloud Upload | Upload screenshots instantly and get a shareable link. |
| Search by Image | Find visually similar images online using built-in Google search. |
| Custom Shortcuts | Set hotkeys for fast capture and editing. |
| Browser Extensions | Capture from Chrome or Firefox without needing desktop software. |
These features make Lightshot a practical choice for creators, educators, developers, and support teams alike.
How to Use Lightshot: A Step-by-Step Guide
Lightshot is built for simplicity, but it still packs powerful features under the hood. Here’s a more detailed guide to help you get the most out of it.
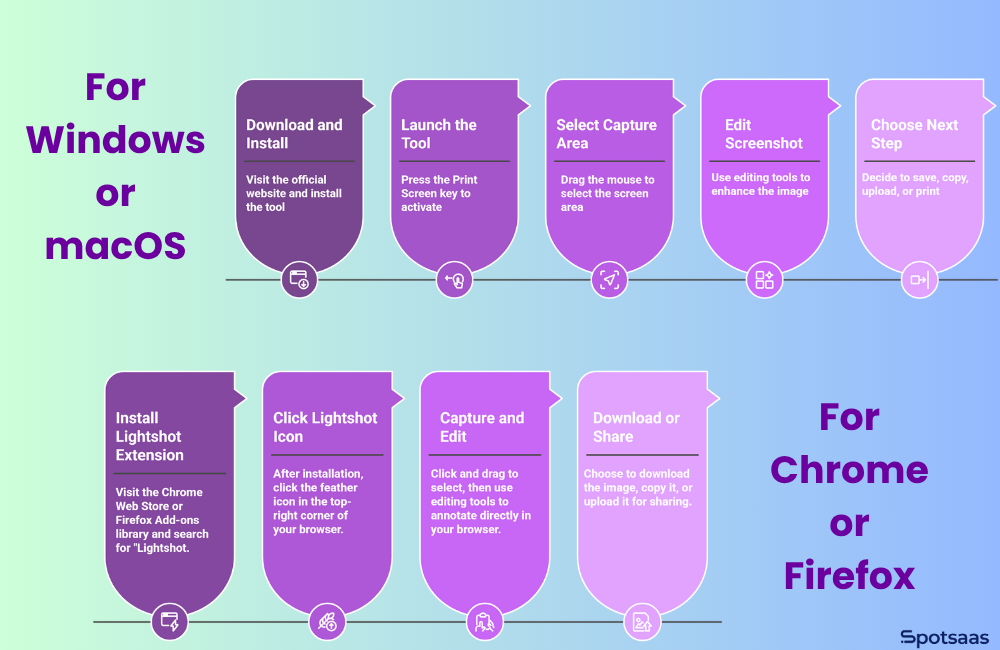
For Windows or macOS
1. Download and install Lightshot
Head over to the official Lightshot website. Choose your operating system—Windows or macOS—and click the download button. Once downloaded, run the installer and follow the basic steps. The tool installs quickly and runs in the background.
2. Launch the tool
After installation, Lightshot automatically maps itself to your Print Screen key (on Windows). On macOS, you can assign a shortcut via System Preferences. Pressing the key will dim your screen and activate the Lightshot selection tool.
3. Select the capture area
Click and drag your mouse to highlight the portion of the screen you want to capture. You’ll see a border around your selected area, along with editing and sharing icons next to it. The selection can be resized or moved as needed.
4. Edit your screenshot
Before finalizing the capture, Lightshot allows you to:
- Add text labels
- Draw arrows or lines to highlight sections
- Use rectangles or freeform drawing tools
These tools appear in a small toolbar near your selection and work in real-time—no need to open another editor.
5. Choose your next step
Once you’ve captured and edited your screenshot, Lightshot offers multiple actions:
- Save it directly to your device (.png or .jpg)
- Copy to clipboard to paste in email or chat
- Upload to prnt.sc (Lightshot’s server) and get a shareable link
- Print your capture immediately for physical use

For Chrome or Firefox (Browser Extension)
1. Install the Lightshot extension
Visit the Chrome Web Store or Firefox Add-ons library and search for “Lightshot.”
Click Add to Chrome (or Add to Firefox) and wait a few seconds for installation.
2. Click the Lightshot icon
After installation, a small feather icon will appear in the top-right corner of your browser. Click the icon whenever you want to capture part of a web page or browser window.
3. Capture and edit
The extension works just like the desktop version:
- Click and drag to select
- Use editing tools to annotate directly in your browser
You don’t need to download anything additional.
4. Download or share
Once you’re done editing, you can:
- Download the image to your computer
- Copy it for use in docs or chats
- Upload it and get a public URL to share with others
Lightshot works quietly in the background but saves time and effort every day. Whether you’re working solo or in a team, it helps turn a simple screenshot into something useful, fast.
Lightshot vs Other Screenshot Tools
While Lightshot is a popular pick for its simplicity and speed, several other screenshot tools in the market offer different strengths. Here’s how it stacks up against some common alternatives:
| Tool | Best For | Key Features | Free Plan |
|---|---|---|---|
| Lightshot | Fast, everyday screen captures | Instant editing, cloud upload, image search, browser extension | ✅ |
| Snipping Tool (Windows) | Basic built-in captures | Rectangle/freeform snips, annotation, delay timer | ✅ |
| ShareX | Power users and automation | Advanced workflows, screen recording, custom scripts | ✅ |
| Greenshot | Offline editing and annotations | Editor, export options, plugin integrations | ✅ (Windows only) |
| Gyazo | Instant sharing via link | Automatic uploads, GIF capture, searchable history | ✅ (with limits) |
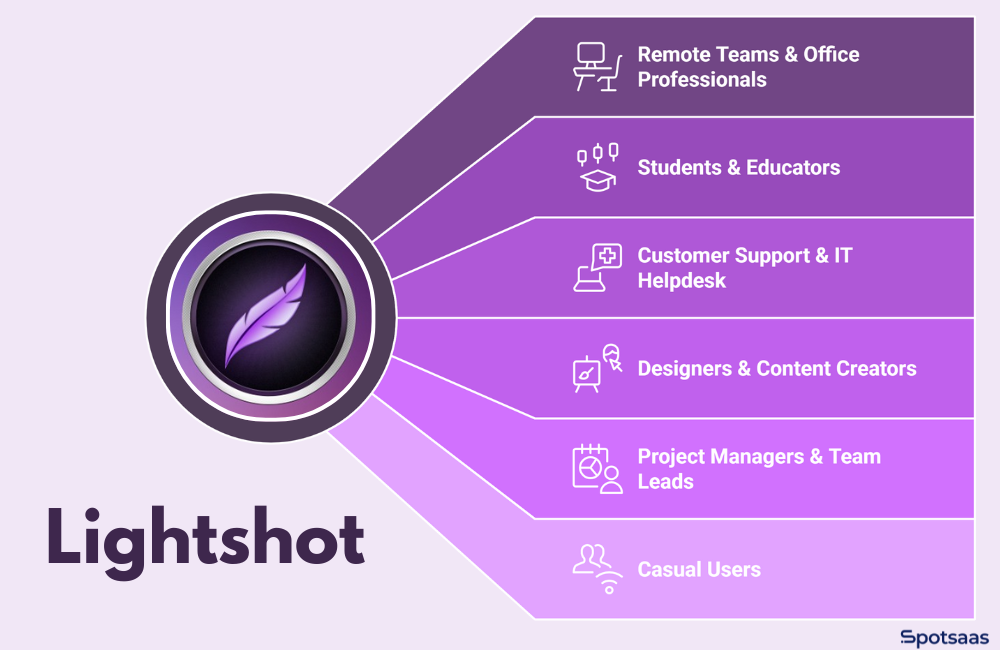
Who Should Use Lightshot?
Lightshot is ideal for anyone who needs to capture, annotate, and share screenshots quickly, without the learning curve of complex design tools. Below are the types of users who will benefit the most:

Remote Teams & Office Professionals
In a distributed work setup, visual communication saves time.
Instead of explaining issues over long emails or Slack threads:
- Capture screens showing bugs, changes, or errors
- Highlight key areas using arrows or boxes
- Instantly share via link—no need to upload manually
Example: A product manager spots a bug in staging and uses Lightshot to mark it and send it to the developer instantly.
Students & Educators
Screenshots are valuable in learning environments, especially digital classrooms.
- Students can save slides, notes, or research from the web
- Educators can provide visual feedback on assignments
- Perfect for integrating with tools like Google Classroom
Example: A teacher uses Lightshot to highlight errors in a digital worksheet and returns it with quick notes.
Customer Support & IT Helpdesk
Explaining tech issues without visuals slows everything down.
Lightshot allows:
- Agents to share annotated screenshots of problems
- Faster issue resolution with fewer misunderstandings
- Easier collaboration between support and technical teams
Example: A support rep walks a user through setup by sending marked screenshots showing each step.
Designers & Content Creators
Even creative professionals need quick markup and capture tools.
- Designers can give feedback on layouts or mockups
- Content teams can grab references or examples
- Useful for sharing ideas without opening a full design suite
Example: A designer circles layout changes on a client’s landing page screenshot and sends it for review.
Project Managers & Team Leads
Screenshots make project updates and tracking more visual.
- Document changes in dashboards or sprint boards
- Call out blockers or missed deadlines visually
- Share annotated updates in daily stand-ups or reports
Example: A PM screenshots the team’s sprint board and adds quick annotations to outline progress and concerns.
Casual Users
You don’t need to be a professional to benefit from Lightshot.
- Save online receipts or confirmation pages
- Share how-to steps with friends or family
- Capture notes or parts of articles for personal use
Example: A user grabs a recipe online, crops just the ingredients section, and shares it via link.
If your workflow involves feedback, collaboration, troubleshooting, or teaching, Lightshot makes screen capturing easy and efficient. It brings the right mix of speed and simplicity to both professional and everyday use.
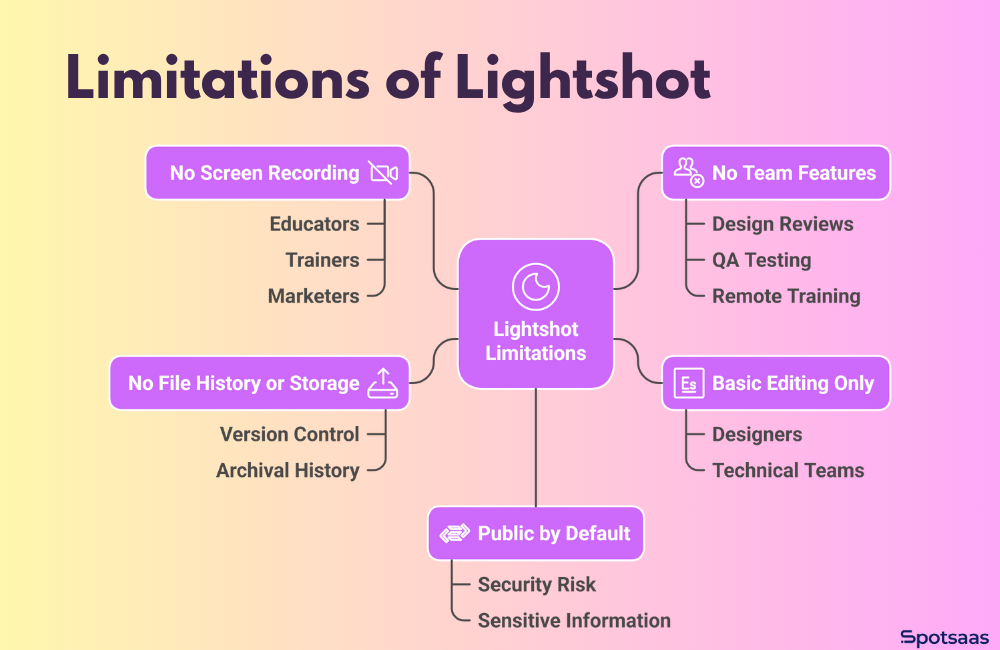
Limitations of Lightshot (What It Can’t Do)
Lightshot is a powerful tool for quick, straightforward screenshot tasks, but it has its limits, especially for users who require more robust or collaborative functionality.

No Screen Recording
Lightshot is built solely for capturing static images. It doesn’t support screen recording, audio narration, or video walkthroughs. This can be a major drawback for educators, trainers, or marketers who frequently need to demonstrate software processes or product features in motion.
If your workflow involves creating tutorials, product demos, or live captures, tools like Loom, OBS Studio, or Camtasia would be more appropriate alternatives.
Basic Editing Only
The editing features in Lightshot are minimal. Users can draw arrows, add rectangles, and type simple text annotations. However, you won’t find advanced tools like blur effects, opacity controls, layered markup, or font customization.
This can be restrictive for designers or technical teams who need detailed, precise visuals to communicate ideas or give feedback. For more advanced editing, you’d need to export your image to another platform like Canva, Figma, or Photoshop.
No File History or Storage
One of the biggest functional gaps in Lightshot is the absence of a built-in screenshot library or account-based storage system. When you upload a screenshot, it’s hosted temporarily on Lightshot’s server and shared via a unique public URL.
But there’s no way to organize, rename, retrieve, or delete your past captures. Once a link is lost or expires, so does your access to that screenshot. This lack of version control or archival history makes it less suitable for long-term documentation or knowledge management.
No Team Features
Lightshot is designed for solo users. It does not support multi-user accounts, shared folders, team annotations, or role-based access. As a result, it’s not ideal for companies or teams managing workflows that rely on visual collaboration, such as design reviews, QA testing, or remote training.
Teams using tools like MarkUp.io, Pastel, or Droplr will benefit from built-in collaboration features that Lightshot simply doesn’t offer.
Public by Default
Another major consideration is privacy. Screenshots uploaded through Lightshot are publicly accessible by default. Anyone with the link can view the image, and there’s no built-in option to restrict access, require authentication, or set expiration times.
For businesses or individuals working with sensitive information—such as internal dashboards, customer data, or private communication—this can present a security risk. You’ll need to be cautious about what you choose to upload and share.
Tips to Get More Out of Lightshot
Despite its limitations, Lightshot remains one of the most user-friendly tools for capturing and sharing screenshots, especially if you know how to make the most of it. Here are a few practical tips to help you enhance your workflow.
| Tip | Details |
|---|---|
| Customize Your Hotkeys | Set your own shortcut key to avoid conflicts and speed up access. Go to the system tray → Lightshot settings → Hotkey tab → assign a new combination. |
| Use the Browser Extension | The Chrome or Firefox extension is lightweight and perfect for web-only tasks. Click the feather icon to capture and annotate directly from your browser. |
| Share Screenshots with Links | Upload screenshots instantly and get a public URL. Great for support tickets, quick feedback, or team chats. |
| Annotate Before You Save | Use built-in markup tools like arrows, text, and highlights before saving to communicate clearly and reduce confusion. |
| Combine with Cloud Storage | Save your screenshots to a synced Google Drive or Dropbox folder for automatic backup and access across devices. |
Customize Your Hotkeys
By default, Lightshot uses the Print Screen key to activate. However, you can assign your own shortcut to launch the tool more quickly and avoid conflicts with other apps. This is especially helpful for users who take multiple screenshots daily or run software that also uses the Print Screen key.
To set it up, right-click the Lightshot icon in the system tray, open settings, navigate to the “Hotkey” tab, and assign a combination that’s easy to remember and quick to access.
Use the Browser Extension for Web-Only Work
If you spend most of your time in a browser, the Lightshot Chrome or Firefox extension is a more lightweight option than the desktop app. With one click on the feather icon, you can immediately select any part of a webpage, annotate it, and upload it without leaving the browser.
It saves time by eliminating the need to switch windows or open another tool, making it perfect for content creators, researchers, and social media managers.
Share Screenshots with Instant Links
One of Lightshot’s best features is the ability to generate a public URL after you take a screenshot instantly. Instead of saving the file, opening an email, and attaching it, you can simply click the “Upload” icon and paste the link in chat or email. This is especially useful for quick feedback cycles, customer support responses, or internal bug reporting.
Annotate Before You Save
To save time and communicate more clearly, get into the habit of marking up your screenshots before saving or sharing them. The built-in tools are ideal for quickly pointing out errors, highlighting content, or guiding users through steps. Adding even a simple arrow or label can eliminate confusion and reduce the need for follow-up explanations.
Combine with Cloud Storage Tools
Although Lightshot doesn’t offer direct integration with cloud platforms like Google Drive or Dropbox, you can work around this by manually saving screenshots to a synced folder.
For example, set your default save path to a Google Drive folder on your desktop. This way, all your Lightshot captures are automatically backed up and accessible across devices. It’s a great way to maintain version history or make screenshots available to team members through shared drives.
Final Thoughts: Lightshot in a Snapshot
Lightshot is a lightweight, fast, and easy-to-use screenshot tool that fits smoothly into everyday workflows. Whether you’re capturing quick visuals for remote collaboration, marking up assignments as an educator, or sharing feedback with your design team, it offers a reliable way to get the job done without any complexity.
With features like real-time editing, custom hotkeys, and instant cloud sharing, Lightshot simplifies the process of capturing and sharing screenshots. While it lacks advanced capabilities like screen recording, private storage, and team collaboration, it still stands out as a practical tool for users who value speed and simplicity.
For those needing more robust features, tools like ShareX or Loom might be a better fit. But if your priority is getting clean, editable screenshots with minimal setup, Lightshot is an excellent starting point.
Frequently Asked Questions
How do I take a screenshot with Lightshot?
To take a screenshot with Lightshot, simply press the Print Screen (PrtScn) key on your keyboard, select the area you want to capture, and then choose from various editing and saving options.
Can I use Lightshot to annotate my screenshots?
Yes, Lightshot offers intuitive annotation tools allowing you to add text, shapes, and highlight areas on your screenshots for clear communication.
Is it possible to share my screenshots directly from Lightshot?
Absolutely! With just a few clicks, you can effortlessly share your edited or unedited screenshots via social media platforms or by generating shareable links.
What file formats are supported for saving my screenshots in Lightshot?
Lightshot allows you to save your captured images in common formats such as PNG, JPG, or BMP according to your preferences.
Does mastering the Lightshot screenshot tool enhance my productivity when working with visual content?
Mastering Lightshot can significantly improve your efficiency by streamlining the process of capturing and sharing visual content seamlessly during tasks like creating tutorials or presenting information visually.


